Swiss GWR Address Data Import Guide
This guide provides a step-by-step process for importing address data from the Federal Register of Buildings and Dwellings into OpenStreetMap (OSM) using JOSM. The register is known in Switzerland's national languages as:
- German: Eidg. Gebäude- und Wohnungsregister (GWR)
- French: Registre fédéral des bâtiments et des logements (RegBL)
- Italian: Registro federale degli edifici e delle abitazioni (REA)
Important Notes
- Only perform automated edits if you fully understand the implications!
- Adherence to OSM's Import Guidelines is mandatory.
- Always review data manually to prevent importing errors.
- When in doubt, consult the relevant OSM Wiki pages or the local mapping community.
- Be aware that GWR data may contain inaccuracies, duplications, missing buildings or improper placements.
- Future updates should align with the same processes for consistency.
- Report wrong addresses to the Federal Statistical Office.
Goals
The primary goal is to improve the accuracy and completeness of Swiss address data on OSM by:
- Adding addresses from the Swiss GWR database.
- Improving maintainability by using nodes instead of ways for (newly added) address data.
- Ensuring accurate placement of address points at building entrances. The GWR assigns addresses to building entrances[1], so nodes at entrance locations can be preferred over tagging ways, buildings, or entrance nodes with address data.
Preparation/Import Data
- Download prepared address data for a municipality from qa.poole.ch/addresses/ch/ by selecting the full dataset O.
- Open JOSM and open the downloaded
BFSNUMBER.osmfile. - Download (🡇) the corresponding OSM map data as a new layer using either:
- Search for the municipality using
Areas around places - Use
Slippy mapor advanced techniques for larger areas.
- Search for the municipality using
- Activate the downloaded OSM Map layer.
- Add aerial imagery via
Imagery>swisstopo SWISSIMAGE. - Install plugins utilsplugin2 and Conflation (
Edit>Preferences>Plugins).
Conflation Process
The conflation process involves relocating address nodes to the correct positions from GWR and importing missing addresses.
| Configuration | |||||||||||||||||||||||||||||||||
|---|---|---|---|---|---|---|---|---|---|---|---|---|---|---|---|---|---|---|---|---|---|---|---|---|---|---|---|---|---|---|---|---|---|
| |||||||||||||||||||||||||||||||||
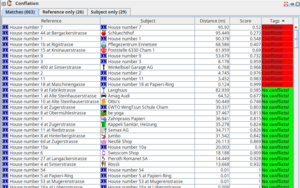
| Review conflation results | |||||||||||||||||||||||||||||||||
The conflation process cannot reposition nodes with entrance=* tags or nodes located on building outlines. If you conflate such addresses, a warning will be displayed. Please review these cases and manually add any missing address data as needed. Recommended workflow
1. Matches Without Conflicts2. Matches With Conflicts
 Conflation Results: The Reference only tab displays entries that are most likely to be ignored. This screenshot was taken after clicking 'Conflate' to import valid addresses. You can either ignore these entries or click 'Remove' to clear the conflation list, ensuring none of these entries are imported.3. Reference-Only Cases
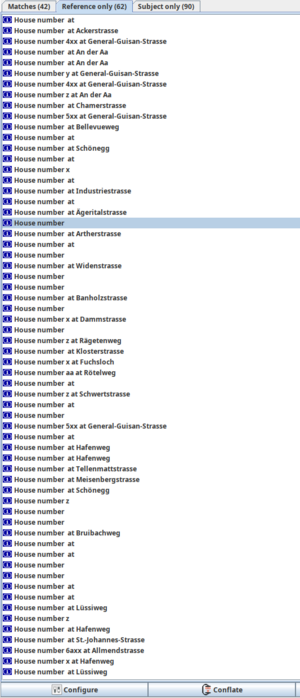
4. Subject only CasesYou will typically encounter the following types of entries: Points of Interest (POIs):
Addresses:
|
Handling Validation Warnings
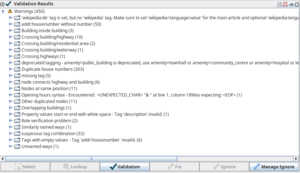
The JOSM data validator checks for common errors made by users and editor programs. Click on upload (🡅) to initiate the validator checks and close the Popup. Go through the validation results pane.
| Duplicate house numbers |
|---|
Manually review and delete duplicates (Duplicate house numbers).
Zoom to problem by pressing Duplicates may be present due to:
|
| addr:housenumber without number |
Remove keys without values: Search for "addr:housenumber"= and delete the keys.
|
| Nodes at same position and
Other duplicated nodes |
| Review duplicated nodes and try to fix the root cause. |
| Suspicious tag combination |
addr:street together with addr:place: Removing addr:street from places usually is the correct solution.
|
Upload
- Review all warnings
- Add descriptive comment:
- Example:
Import addresses (MUNICIPALITY), move address to entrance
- Example:
- Specify data source:
- Example:
GWR data, dated 2024-10-29
- Example:
- Upload
Discussion
https://community.openstreetmap.org/t/wiki-swiss-gwr-address-data-import-guide/
Optionalː Removal of Address Data on Ways or Nodes on Building Edges
|
Only use this step in municipalities where you have local knowledge or where the local community supports placing addresses as nodes at entrance positions over addresses on building outlines. Avoid applying this process in well-mapped municipalities. Always verify data removal manually. |
This step can be performed before the Conflation Process. It primarily aids in facilitating future imports of updated address data.
The GWR assigns addresses to building entrances[2]. Therefore nodes at entrance locations can be preferred over tagging ways, buildings, or entrance nodes with address data. This approach enhances maintainability and reduces the risk of conflicts or ambiguities during updates.
Positive Aspects of Removing Addresses Not on Nodes:
- Prevent Duplication: Redundant tags on buildings, entrances, and ways lead to overlapping information that can confuse users and tools interpreting the map.
- Ensure Accuracy: GWR address data provides precise entrance points. Tagging buildings or ways with addresses creates less precise, harder-to-maintain data.
- Facilitate Future Updates: Placing addresses on nodes, rather than ways or building outlines, ensures future imports or adjustments can easily replace or update data without breaking consistency.
- Preserve Conflation Accuracy: Address data from ways cannot be automatically moved to entrances or aligned with GWR-provided positions. Removing these tags prevents errors and ensures that the imported data matches real-world building entrances.
- Restoration During Conflation: All address data removed during this cleanup is added back in the conflation process. This ensures that no addresses are lost, and the final dataset includes precise and up-to-date address information at the correct entrance nodes.
Negative Aspects of this stepː
- Duplication: Manual verification is required to ensure no important local details are removed inadvertently. This is particularly crucial in areas with well-mapped, manually added data such as POIs inside buildings, which do not have address data, but can use the address data of building outlines.
- Reduced Readability: In some cases, mappers may find addresses on building outlines easier to interpret than on "disembodied" nodes.
- Impact on Mapper Morale: Removing or changing existing data can alienate contributors who invested time in mapping. Consideration for local mappers’ work is critical to maintaining trust within the community.
Guidelines for Implementation:
- Check Local Community Consensus: Confirm that the local mappers agree with using nodes for addresses.
- Preserve Existing Manual Edits: Avoid overwriting data added by local mappers without careful review.
- Use in Specific Cases: Restrict this step to municipalities where GWR address data offers a clear improvement over existing data.
Removing address data from building outlines or other less-precise placements can enhance accuracy and consistency, particularly when preparing for GWR-based imports. However, this process must be carried out with caution and respect for local mappers’ contributions to ensure the community remains collaborative and supportive.
| Common Initial Steps (Required for all operations) | |
|---|---|
The downloaded OSM Map layer needs to be always active for the data cleanup. Ensure that you only select and remove data for one municipality:
| |
| For ways | For Nodes on Building Edges |
In the results, select only elements without distinct names (POIs) like |
|
| Common Final Step (For all operations) | |
| |


