User:GOwin/Alay Data
This is a temporary page from our imagery collection meet-up last 4th November 2023, which was informally dubbed as "Alay Data" . It translates to "Data Contribution" or "Data Offering" pledge, and is and a word play of a civic event called "Alay Lakad" in the Philippines, which probably traces its roots from the religious pledge of Christian devotees and their walking pilgrimages made between Maundy Thursdays and Good Fridays.
The Activity
There was a suggestion to make this activity regular (or at least, once every quarter), so this page will try to collect notes and feedback to ensure that the process is documented (and can be replicated) and improve the over-all participants' experience.
Tools
Pre-event Planning
- Brouter for route planning
What makes a location ideal for an "Alay Data" activity
- Area should be safe for participants, whatever transportation mode they're using.
- Residential areas are best
- If you have participants who are driving vehicles, they may be assigned to cover high-traffic roads, or further out.
- Post-collection activity is fun (and could be a little noisy), try to find a venue with outdoor areas to avoid inconveniencing other folks
- This is a great way to exchange experiences and tips
- If your participants only plan to collect imagery, but not interested in registering in street-level imagery platforms, you can collect the photos and tracks, and upload them on their behalf (possibly using a separate user account dedicated just for that purpose).
- This might happen with one-off participants , or participants who couldn't access computers or the Internet.
- One of the organizers may need a laptop for this.
- For these participants, recommend the following setup:
- OpenCamera
- OsmAnd + recording plugin
- This might happen with one-off participants , or participants who couldn't access computers or the Internet.
- Post-collection activity could include skill-sharing segments (e.g. Intro to OSM, Advanced use of OsmAnd, collecting thematic data, etc.)
- Or, just enjoy regaling your experience, and each other's company over coffee and some snacks.
Collection Tools
- Action camera or Smartphone's camera
- If you use the latter, you may use your selected platform's own app, or use a third-party app (like OpenCamera) to take photos at timed interval (i.e. every 2 seconds)
- A mount, harness, or selfie-stick for hand-less operation
- This is strongly recommended, unless you're collecting imagery on foot, and even if you're doing that, a selfie-stick is quite convenient for longer walks.
- A map or navigation app
- Unless you're covering short, straight-forward routes, memorizing or repeatedly checking a map could be a hassle.
- There are apps (like OsmAnd) that support turn-by-turn navigation for the appropriate transport mode (walking, cycling, or driving)
Post Processing
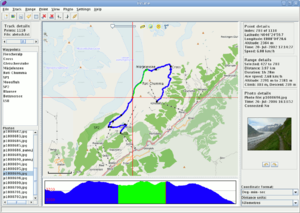
Using GpsPrune to Correlate Photos
GpsPrune is an open source utility for working with data from GNSS (i.e. GPS, Glonass, etc) receivers, and is useful for participants who use cameras without built-in GNSS. Two of the participants used One X Inta360, and we tried to experiment two approaches: (1) Geotagging photos using the Insta360 app from mobile; (2) Geotagging photos taken with a track recorded for another app (in this case, Osmand, since it's already used for turn-by-turn navigation.)
After installing GpsPrune, and preparing your track, and your images, simply do the following steps.
1. Go to File > Open File and select your tracklog recording.
2. Go to File > Add photos and select the folder containing your GPS photos.
3. Go to Photo > Correlate Photos. If necessary, adjust the offset time between your track and your photos.
4. After the geotagging process, saved the coordinates with the photos' JPG exif information. You do this by going to Photo > Save to Exif.
Some reminders & caveats:
- If you're using Windows, you may have to install an additional program called exiftool to make this work.
- GNSS tracklog information should have timestamps associated with the points and (ideally) your camera's time should be in sync with that of your GNSS device.
- When saving Exif data, do not overwrite your files, unless you know what you're doing.
- If you're already using JOSM, simply use the photo_geotagging plugin.
Using JOSM to Correlate Photos
- Use the photo_geotagging plugin.
Uploading photos
The most popular option is Meta's Mapillary, but a non-commercial project in France called Panoramax/Geovision is worth a go, if you could be bothered uploading copies there as well.
