JOSM/Plugins/RelationDissolve
The RelationDissolve plugin for JOSM simplifies creating new relations (especially boundaries) based on merges of relations that already exist within OpenStreetMap.
It removes the need to manually dissolve the borders that are shared between the merged relations.
The plugin preserves enclaves and exclaves as appropriate.
The existing relations are not altered in any way.
Installation
Search for and install the RelationDissolve plugin. Specifically:
- Open JOSM and navigate the menus Edit > Preferences > Plugins.
- Click the Download list button at the bottom to make sure the plugin list is up-to-date.
- Scroll to, or search for, "RelationDissolve" and tick the box. Click OK. The plugin is installed without needing a restart.
To verify installation download some data from OpenStreetMap that contains some relations - e.g. an area that includes some borders.
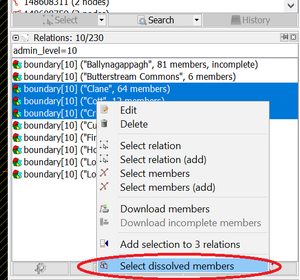
In the Relations Window on the right (menu Windows > Relations or use Alt+Shift+R to toggle), right-click a relation and there should be a menu option Select dissolved members.
Suggested workflow
This plugin is designed to integrate with the many existing JOSM tools and workflows used to create relations. For example:
- Download an area that includes at least a portion of each of the existing relations to be dissolved/merged/concatenated/aggregated.
- In the Relations Window (Alt+Shift+R to toggle)
- Confirm all the existing relations to be dissolved are listed. Note that the list can be filtered by supplying some filter text (e.g. admin_level=10 or parish) into the text box just above the list.
- Select the multiple existing relations to be used to create the new relation. Multiple-select by using the Ctrl keyboard button or equivalent.
- Right-click on any of the selected relations and Download members if any of the selected relations are incomplete.
- Right-click and Select dissolved members so that only the outermost and innermost (if any) members of the selected relations are selected in the main map window.
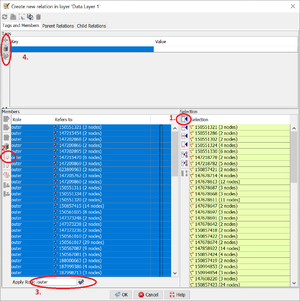
- Click the Create a new relation button (left-most button under the list of relations) and proceed as normal to create a new relation based on the current selection. E.g.
- Click the Add all objects button to transfer objects from the Selection list to the Members list.
- Click the Sort the relation members button to reorder the members into a loop or loops and scroll to verify that only the outermost and innermost (if any) members have been selected.
- Mark the member loops as outer or inner as appropriate
- Populate the relation tags. Note that multiple tags can be pasted using the Paste tags from buffer button. To place tags into the buffer go to the Tags/Memberships Window (Alt+Shift+P to toggle), select an existing relation with the tags to copy, right-click and Copy all Keys/Values.
Development
The source-code, binary releases and issue tracker for this plugin are on Github at https://github.com/jkennedyie/relationdissolve
Acknowledgement
Thanks to the National Centre for Geocomputation at Maynooth University, Ireland for facilitating the development of this plugin.

