Java Applet
- About
- The Java Applet was a Java-based in-browser editor. It was the original editing interface appearing on the 'edit' tab on the OSM homepage.
- Reason for being historic
- This was replaced by the Flash-based in-browser editor Potlatch back on 5th May 2007. See also History of OpenStreetMap.
- Captured time
- November 2016
| Java Applet | ||||||||||||||||||||
|---|---|---|---|---|---|---|---|---|---|---|---|---|---|---|---|---|---|---|---|---|
| License: | GNU GPL | |||||||||||||||||||
| Platforms: | Windows, Linux, and macOS | |||||||||||||||||||
| Status: | Broken | |||||||||||||||||||
| Version: | (2007-12-24) | |||||||||||||||||||
| Language: | English
| |||||||||||||||||||
| Programming language: | Java | |||||||||||||||||||
|
discontinued, replaced by Potlatch |
||||||||||||||||||||
| ||||||||||||||||||||

Status: Since then the java applet has not been maintained, and is not running anywhere. It does not work with the latest API version. It is compatible with API v0.4.
If anyone does want to see and use the applet you will need to host your own copy or run it as a local java application. But since it doesn't work with the latest API, it will no longer function as an editor.
Running the java applet
In order to edit maps, you must be registered and logged in.
Originally you were then able to go to click the "edit" tab to take you to the Java applet for editing. Currently to run the java applet you will need to run your host your own copy or run it as a local java application.
The Java Applet editing interface uses Java, so be sure to enable it in your browser. It requires Java version 1.5 or above. Get the latest Java browser plugins from Sun's download page (or your favourite JVM provider)
The Java applet requires some extra permissions, which you will need to grant.
Screencast
This screencast gives a brief, high level introduction to editing with the applet.
The applet interface
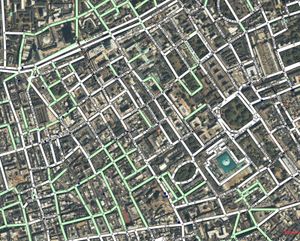
When the applet loads, you will see a view of the map with a satellite photo beneath it.
In the top left corner is a toolbar, with features described below.
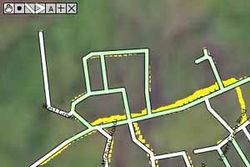
Green lines represent lines that have already been drawn in but do not yet form part of a way, and black dots are nodes. White lines represent line segments that have been made into part of a way. A red node shows the currently active node (e.g. when drawing lines).
Everything you do is saved as you edit, so there is no separate "upload data" stage.
The toolbar
The following tools are available in a small toolbar in the top-left. Descriptions will also appear in your browser status bar as you mouse over the toolbars.
Keyboard shortcuts
| [ ] | Zoom in, Zoom out |
| { } | Increase/decrease Yahoo! Aerial Imagery detail |
| − + | Increase/decrease the size of map features |
Editing
The purpose of the editing applet is to allow you to enter nodes, which define points on a road or path etc., and then for you to join these nodes together to form line segments, which define the path of the road or path, to produce the basic map. Line segments can then be combined with adjacent segments to form part of a longer "way". The following explains how to do these simple tasks.
Go to the viewer and zoom in on an area that you want to work on. It helps to pick an area that you know reasonably well. The place where you live is probably the best place to start, then work outwards from there. If what you see doesn't make any sense then pan around a bit until you see something distinctive that you recognise.
For an instructional video, created by Imi, which shows the more advanced features of the applet see: http://www.eigenheimstrasse.de/josm/tutorials/applet-tutorial-ways.ogg (playable with VideoLAN).
| Adding nodes
To plot new nodes you select the "Add node" toolbar button ( Click where you want to add the node. You may need to click twice if the applet didn't have the focus. A navy blue dot, called a Node, should appear on the spot you clicked. You can also add nodes to existing segments by clicking near enough to them. If you can't clearly see the black nodes (dots), you need to increase their size by pressing + repeatedly on your keyboard. As you do this, the black nodes and the green and white lines will both increase in size. |
|
| Creating line segments
Keep adding nodes (black dots) along the route that your line will follow. Once you have drawn enough nodes to describe a section of line clearly, use the add segment toolbar button ( Mark further nodes along the road that you want to map. If the road is quite straight then the dots can be quite far apart (as a rough guide, 3 to 6 nodes per screenful is about right). If the road curves then the nodes will need to be closer together to get a nice smooth shape. You may want to tidy up the line of the road by selecting the Move toolbar button ( If you're drawing a road that is a one-way street, it's helpful to draw the line in the direction of travel. If it's not a one-way street, you should draw it in a left-to-right, top-to-bottom direction where possible. Street names are rendered in the direction of the segments, so drawing segments right-to-left will result in upside down streetnames. The next step is to create a 'way'. |
|
| Creating a way
To create a way click the "create way" toolbar button ( Note, even if your street consists of just one segment, you should create a way consisting of just that one segment. Then information about that street should be added to the "way" not to the "segment". |
|
| Way properties
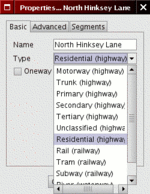
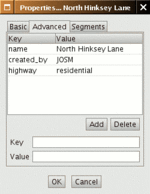
In the "basic tab" you can enter the street name, and tag it as the most common types of roads. If your chosen road type is not shown here you will need to use the Advanced tab. If you're not sure which tag to use, or need to see what other tags you could use, then see the map features page If you are happy with the details you have entered then click the "OK" button.
Adding or removing segments from an existing way can be done by bringing up "Way Properties" for the way by clicking "A" (property mode) and select one of the segments of the way. Now select the "Segments" tab and tick the "Change" checkbox. The segments currently associated with the way is colored red on the map and segments can now be added/removed by clicking them on the map. Be sure to find your way back to the "Way Properties" dialog and press "OK" after changing the segments or else you changes will be lost! |
|
| Names
Please do not copy street names from an existing copyright-protected street map. These printed maps contain "gotcha's" to catch copiers and establish a basis for infringement of copyright. If you know the name of the street or road that’s fine, otherwise please verify it first. |
Integration with other editors
Many OSM contributors use the applet in conjunction with other editing tools. Examples:
- Create nodes in the applet, then download those nodes in JOSM to combine them into segments and ways
- Create a map with approximate positions in JOSM, then use the applet to drag nodes around until they align with visible features
Using a different editor for some tasks means that you can edit your data while the applet is busy loading the next area.
Next steps
Once you have mapped a few roads you may want to try your hand at road junctions and roundabouts. The Editing Standards and Conventions page gives some illustrated examples as a guideline. These are fun and interesting to draw. Once you feel confident, you may even want to try your hand at a freeway intersection or two.
Troubleshooting
- Sometimes the applet will not download tiles from the Yahoo site. In this case, you will see a gray area, to fix this re-click the "edit" tab to reload the current area.
- Sometimes the nodes are too small to see. Use the + key repeatedly to increase their size. Use - to make them smaller.
- Sometimes the applet will not display a background satellite map. It is unclear what to do in this case.
Bugs
There are a number of bugs in the Java applet. We keep track of these using "trac" (bug-tracking system). Query to find all applet bugs. You can raise new bug "tickets" directly if you create a trac account, alternatively discuss the issue via one of the Contact channels.
The applet will spew debugging information including Java stack traces to the JVM console. This may be useful in diagnosing problems, particularly when the applet seems to crash. On Microsoft Windows, Look for a little Java icon (blue coffee cup) in your system tray in the bottom right. Right click and choose "Open console". This may vary depending on JVM installation options and certainly operating system.
Development
Development Status
Potlatch was deployed on the website in May 2007. This is a flash based alternative to the applet, targetted at the same audience. Since then there has been little development progress on the applet.
There is still some potential use for the applet, to provide an alternative editor for people who cannot run flash (might also run better on some devices)
The applet code will currently not work with API v0.5 (some major changes including no more 'segments') so that would be a priority for anyone wishing to revive this work.
Applet Design Goals
Simple
The applet is quite simplistic, especially compared with JOSM (standalone java app). The reasons...
- It should be an easy-to-learn editing environment for drawing ways and adding metadata to existing ways. A clear, uncluttered UI is paramount for this audience.
- It should be a fairly smooth transition from 'view' tab to 'edit' tab, as such we dont want to have lots of tool bars/panels appearing.
- We want it to load as fast as possible.
With simplicity in mind, a lot of new development ideas may be rejected, despite being good ideas.
Source Folders Overview
The source code and resources are under applications/editors/applet
To do a proper subversion checkout see Getting The Source
The applet directory includes build.xml - ant build script, and the following sub-directories
- html - page for local test.
- lib - JARs used by applet.
- src/org/openstreetmap/ - applet code.
- client - Guts of applet - tile downloader/renderer, server commands and comms. Including GPX parser.
- processing - Main app (OsmApplet - startup and screen drawing), edit/view mode handlers.
- gui - Handling of edit dialogs.
- test - Empty :(
- util - Zip-based HTTP wrappers, feature models.
Implementation Description
Implemented as a Java applet - not directly on AWT, but using a library/framework from processing.org.
The UI has achieved simplicity in some ways, but maybe could do with some changes to make more intuitive - suggested enhancements are in trac.
There have been some major bugs that effectively crash the applet. Mainly these were due to a lack of appropriate synchronisation - fixes are committed and now under test - please see Concurrency below for detail on the new concurrency conventions.
The code has been tidied up somewhat recently, but the edit code is still a bit hit and miss. All the code's there though, and is eminently fixable/tidyable.
Following is what the applet's main classes do.
org.openstreetmap.processing
- OSMApplet - the main applet, extended from PApplet from processing.org. The startup, drawing layout (some delegated out to other objects, e.g. Tile), piecing together code (e.g. delegating to tile / mode manager) and holding the singleton MapData reference.
- ModeManager - responsible for selecting mode and drawing toolbar, as well as delegating mouse/key events to individual modes.
- *Mode - class per mode, e.g. handlers for mouse events. There is one mode per toolbar button (which is perhaps why zoom ended up the way it is!).
org.openstreetmap.client
- Tile - Manages the image tiles - identifying the ones needed (based on mouse drags / zoom), queuing/requesting/caching them and also handles the redrawing of the tile background.
- ImFetch (in Tile.java) - Code to manage tile download queue and thread pool.
- VFetch (in Tile.java) - Thread/high-level code to manage OSM vector info - uses Adapter to pull down data (nodes, segments, ways) and then update's the applet's MapData instance with it.
- ImBundle (in Tile.java) - Represents a tile and generates a unique key for each (used for image cache / queue uniqueness).
- ServerCommand - interface for classes modelling edit operations.
- Adapter - Does all OSM server communication (getNodesLinesWays() and putXMLToURL(), with retries) and modelling of editing commands by ServerCommand inner-classes which udpate local data structures and send requests to server (by adding to CommandManager queue).
- CommandManager - Threaded server command queue.
- MapData - New class. Holds all low-level map data in single object, acting as lock object for map data synchronisation. Used as a singleton instance by applet, new map downloads only update the internal data of this instance. This allows the various parts of the applet code to refer to a consistent lock object.
org.openstreetmap.gui
Dialog-handling for editing of map and message boxes. NB: Not all GUI code is in this package.
org.openstreetmap.util
- GzipAwareGetMethod - compression-enabled HTTP get used for OSM vector data download.
- GzipAwarePostMethod - not used (putXMLToURL() not compressed).
And some classes modelling map features (should probably be in a 'model' package, not util):
- OsmPrimitive - base for model classes
- OsmWriter - output of model classes to XML (string-based rendering).
- Line, Node, Point, Way etc. - feature representation classes.
Concurrency
There have previously been problems with handling of concurrency in applet - following these conventions should keep the applet in-order, reliable and responsive:
Threads
The threads used by the application, with their lock-order conventions:
- main thread - swallowed by container
- applet thread - started by PApplet super, runs applet initialization in setUp(), then calls applet draw() to paint window (well paints buffer that is used), following every redraw() call from applet. NB: when thread enters draw(), it already has applet instance lock.
- lock order - (1) OsmApplet instance (draw()) then (2) Tile instance (draw())
- ImFetch threads - a pool of threads used to download image tiles
- single locks only, either (A) ImFetch instance or (B) Tile instance or (C) OsmApplet instance (redraw())
- VFetch thread - vector map data fetch thread, downloads from API map resource
- single locks only, either (A) MapData instance (updateData()) or (B) OsmApplet instance (redraw()) or (C) Tile instance (updateChanged()) (or (D) temporary local MapData instance)
- AWT event thread - the main UI thread on which all mouse/key events arrive
- locks (A) (1) Tile instance (removeUnusedTiles()) then (2) ImFetch instance (add() for queuing image downloads) or (B) (1) CommandManager sleeper (add server command to q) then (2) MapData instance (change map) or (C) (1) OsmApplet instance then (2) MapData instance - in various edits of map after user clicks
- CommandManager thread - communicates instructions to server API
- locks (1) 'sleeper' lock (to pickup new commands from event thread) then (2) MapData instance (to change client map)
Locks
The synchronisation objects used in the applet, to be locked in orders specified in Threads above. The locks are listed below in a rough high->low order (rule of thumb: lock high level locks first, then lower, never obtain high level locks from within lowest level objects):
- OsmApplet instance 'applet' - sync on this protects draw() cycle & ensures draw variables updated from event thread before cycle starts
- Tile instance 'applet.tiles' - sync on this protects/makes available tiles in the 'images' vector
- ImFetch instance - protects imv vector of queued-for-download image handles/urls (ImBundle instances)
- CommandManager instance's sleeper object - used to queue server requests for CommandManager thread to wake-up and send them.
- MapData instance - help by applet, available via 'applet.getMapData()' - sync'ed on for edits (make map edits transactional by synchronising around all edits) and for draw() cycle access to map data.
Applet parameters
There are a number of these, passed in html applet tag's param sub-tags (see map edit page source).
- 'clat', 'clon' - starting position
- 'user', 'pass' - openstreetmap login
- 'tileThreads' - number of image tile download threads, default 4, makes difference to increase if fast connection
- 'windowWidth', 'windowHeight' - applet's understanding of its size - sync with width/height attributes of applet tag
- 'debugToPage' - true = output debug to appletDebug() function - can be helpful for testing, default false
- 'abortable' - true = allows explicit abort of map download, from cheesy on-screen cancel button, default false
- 'timeout' - server connect timeout in seconds, default 15
- 'socketTimeout' - server post-connect socket timeout in seconds, default 120
- 'retries' - max number of server retries, default 5
- 'injectTimeouts' percent chance of (simulated) timeout, for testing, default = 0, i.e. no timeouts


