Go Map!!/Submitting Changes
< Go Map!!
Jump to navigation
Jump to search
This page describes the requirements and process of uploading you're changes to the OSM database.
Submitting Changes
Upload Changes
Once you are done with editing the database. You will press ![]() . This will open up the uploading screen.
. This will open up the uploading screen.
All edited OSM data is saved on device and won’t be removed when the app updates or restarts. Remember the upload button appears only when you have made edits.
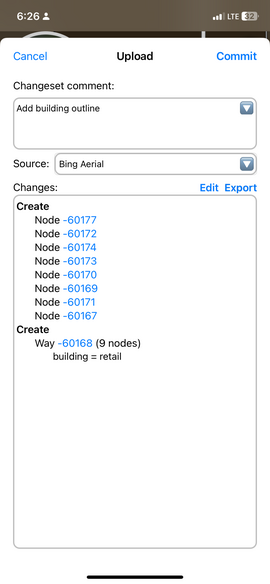
Upload Screen
Here, you will be able to add details or fix your changes.
- Changeset Comment
- Here you describe what changes you did to the database to help others understand the history of the element.
- Source
- Here you add the source or information you used to create your information whether that be the aerial imagery you used, surveying the area, or from authoritative sources. (Allowed sources)
- Changes
Once your done either inputting info or fixing your changeset press “Commit”.
Good Practices
- Adding a good description of the changeset you made. See Good changeset comments
- Making multiple related edits BEFORE performing a single upload. (This helps reduce server load, and also helps you "preview" your changes prior to committing them!)
Change rollback/Revert
Remember you cannot undo your changes as when you upload your undo, redo history is removed in-app. But, you can do a change rollback (also known as a revert). See Change rollback for more info.
