Fa:Key:bridge
اگر به مقالهٔ اصلی تسلط دارید (زبان انگلیسی)، لطفاً در ترجمهٔ آن کمک کنید. آشنایی با شیوهٔ ترجمه در این ویکی.
بهنظر میرسد هماکنون کسی روی این ترجمه کار نمیکند.
| توضیحات |
|---|
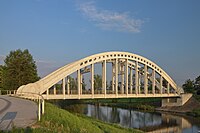
| پل به سازهای مصنوعی گفته میشود که از روی عوارضی مانند جادهها، خطوط آهن، آبراهها یا درهها میگذرد و بر روی آن یک جاده، خط آهن یا عارضهٔ دیگری کشیده میشود. |
| گروه: پلها |
| روی این عنصرها بهکار میرود |
| مقادیر مستند: 10 |
| ترکیبات مفید |
| همچنین ببینید |
| وضعیت: پذیرفته |
| ابزارهای مفید برای این برچسب |
تگ bridge=* را زمانی استفاده کنید که یک جاده، خط آهن، path canal، خط لوله یا مشابه آن روی یک پل هدایت میشود. مقادیر اصلی این تگ چندان زیاد نیستند و در زیر آمده. گونهها و مشخصات بیشتر پل را میتوانید با استفاده از تگهای bridge:structure=*، bridge:support=* و bridge:movable=* توصیف کنید.
از این تگ همچنین برای مشخصکردن نوع man_made=bridge استفاده میشود.
در جایی که عارضهٔ زیرین با زمین احاطه شده معمولا این عارضهٔ زیرین است که باید برچسب تونل tunnel=* بگیرد. البته گاهی خودتان باید قضاوت کنید که یک وضعیت خاص را با استفاده از تونل تگگذاری کنید یا با استفاده از پل. اما در هر صورت، از بهکاربردن همزمان تونل برای راه زیری و پل برای راه رویی پرهیز کنید.
چطور نقشهکشی کنیم
راه بالاتر را در هر دو سر پل دو نیم کنید (یعنی از نقطهای که پل به زمین اتصال پیدا میکند) و به قطعهای که در وسط میماند تگ bridge=yes بدهید. خوب است عادت کنیم که نقطهٔ انتهای پل به تقاطع خیابانها یا مشابه آن نچسبد. پل یا قبل از تقاطع تمام میشود (حالت طبیعی) یا اگر در جایی تقاطع در واقع خودش در میان هوا قرار دارد، راههای دیگری که به تقاطع ملحق میشوند نیز باید در قطعههای مربوطه تبدیل به پل شوند.
رَمپی که در یک سر پل قرار دارد جزوی از پل نیست و میتوانیم آن را با embankment=* تگگذاری کنیم. در بیشتر موارد embankment نباید تگ لایه (layer) داشته باشد.
به بخشی از پل که بین دو تا از تکیهگاههایش قرار میگیرد دهانه گفته میشود. برخی پلها یک دهانه دارند، برخی بیشتر. معمولا مشخصکردن نوع تکیهگاه دهانهها به علاقهٔ نقشهکشی برمیگردد. انواع مختلف دهانهها (مثلا قوسی، تیری، خرپا) را میتوانیم با استفاده از تگ bridge:structure=* توصیف کنیم، در حالی که تکیهگاههای زیر چند دهانه و در سر پلها را در صورت نیاز میتوانیم با bridge:support=* توصیف کنیم. هنگامی که پل بیش از یک نوع دهانه داشته باشد شاید لازم شود که راه در چندین نقطه در طول پل به دو نیم تقسیم شود. برای آرایشهای خاص از دهانهها برچسب bridge=* را بهکار ببرید: توضیحات ذیل برچسبهای bridge=cantilever، bridge=trestle و bridge=viaduct را ببینید. سایر پلهای دارای مشخصات تخصصی نیز در زیر آمده.
برخی پلها متحرک هستند: یک یا چند دهانه میتواند جابهجا شود و فضای خالی بیشتری در بالای راه زیرین بهوجود بیاورد. اینگونه پلها را با bridge=movable تگگذاری کنید. سازوکار حرکت پل که بنا به معماری بهکار رفته در دهانههای پل تعیین میشود را میتوانیم در صورت علاقه در نقشه بیاوریم. برای این منظور از تگ bridge:movable=* استفاده میکنیم. This tag can also be used to indicate bridge spans which once moved and are now fixed shut.
Restrictions
If the bridge has a maximum weight, axleload or length then add a maxweight=*, maxaxleload=* or maxlength=* to the upper way.
If there are restrictions on the class of vehicles or users of the bridge use the access=* tag.
If there are legal height limits for vehicles using the lower way (passing under the bridge) use maxheight=* - see the key page on which section of the way to put it. For physical height limits use maxheight:physical=*.
Layers
Bridges should have a layer=*, for simple crossings almost always layer=1 but other values may be appropriate for complex crossings.
Naming
Where the bridge has a name there are a number of options for tagging. The one chosen is partly personal choice but may also depend on the significance of the bridge:
- When man_made=bridge is used it should hold bridge specific-attributes like name, reference, etc.
- Use name=* tag itself to hold the name of the bridge rather than the name of the road itself. This approach has the advantage that it will get rendered.
- Use the street/road name for name=* field and put the name of the bridge in bridge:name=*. This approach has the disadvantage that it will not get rendered.
If the bridge has former names these can be tagged using bridge:old_name=*.
The building number
A bridge reference can use bridge:ref=*.
Tags to use in combination
- start_date=*
- image=*
- wikipedia=*
Don't use the tag building=bridge just for marking bridges (their outlines). For such purposes you can use man_made=bridge. The tag building=bridge refers only to buildings which are used as bridges.
Other features of the bridge can be mapped and/or tagged with bridge:structure=* and bridge:support=*.
If the bridge has former names these can be tagged using bridge:old_name=*. A bridge reference can use bridge:ref=*. When using the proposed relation or man_made=bridge the keys old_name=* or ref=* can be used. Bridges can also be annotated with wikipedia=* and other standard annotation tags. start_date=* can be used to indicate the date on which the bridge was opened for traffic.
Bridges with several roads/ways or additional features
In case a bridge is represented by several ways or carries additional features there are currently two ways to indicate this:
- With man_made=bridge the outline of the bridge is drawn and the roads/ways passing the bridge are connected to the outline. All bridge-specific attributes like layer, name, reference, etc. can be tagged directly on the outline. In case of bridges with multiple levels the proposed relation bridge has to be used additionally.
- When using the proposed relation bridge all features of the bridge have to be members of the relation and all bridge-specific attributes can be tagged in the relation. In case the bridge has multiple levels only the relation can be used in order to group together all objects of the bridge.
Outline of bridges
The outline of large bridge, especially those carrying several ways should be drawn using man_made=bridge. The outline should have the same layer as the ways.
Objects and features on bridges
Node-type objects which are part of the bridge-way are commonly considered to be on the bridge, these do not need an own layer tag.
More complex situations could be handled with an extension of man_made=bridge or Relations/Proposed/Bridges and Tunnels.
Proposed features/Simplify man made=bridge mapping has some related ideas.
Bridges and waterway routing
Bridges are landmarks and can pose significant obstacles/hazards for navigability.
See
Values
Many types of bridges not listed in the table below can be tagged with either of
| Key | Value | Element | Comment | OSM Carto | Photo |
|---|---|---|---|---|---|
| bridge | yes | Non-specific bridge tag, possibly combined with other bridge:* tags. | 
| ||
| bridge | aqueduct | A longer structure for carrying a canal or fresh water. Consider using historic=aqueduct for significant ancient aqueducts. | 
| ||
| bridge | boardwalk | A plank walkway over wet or otherwise difficult terrain, usually low to the ground and supported by posts. | 
| ||
| bridge | cable-stayed | Discouraged: Please use defacto bridge=yes + bridge:structure=cable-stayed instead. | |||
| bridge | cantilever | A bridge where a span is supported at one end only. Usually, the free ends of two spans are fastened to one another, giving a longer clear span between supports. | 
| ||
| bridge | covered | A covered bridge has a roof and fully or partly enclosed sides, usually to protect the bridge deck and members from deterioration. Consider also the combination bridge=*+covered=*. | 
| ||
| bridge | low_water_crossing | Also known as an "Irish bridge", this is a low bridge which is engineered to carry vehicles above water at low flow levels and survive submersion at high flow levels. Consider also adding either ford=yes or flood_prone=yes on low-water-bridges that will sometimes be flooded on a seasonal and/or intermittent basis (see Discussion page). | 
| ||
| bridge | movable | Movable bridges contain a span that can be moved up or to the side, often to provide greater clearance for traffic moving beneath the bridge. All such spans should be tagged with bridge=movable. Further information may be provided using bridge:movable=*. The fixed spans should be tagged separately, to make clear which part of the bridge is and is not movable. | 
| ||
| bridge | trestle | A bridge composed of a series of short spans where each span is supported by a rigid frame, usually called a "bent" rather than a pier. | 
| ||
| bridge | viaduct | A bridge composed of a series of spans, often short relative to its overall length. The spans may be arches, girders supported by piers, etc. For ways or features that raise a feature above the natural ground on mounds or earth walls, use embankment=*. | 
|
This table is a wiki template with a default description in English. Editable here.
Proposals
- Relations/Proposed/Bridges_and_Tunnels. This enables the grouping of several ways using the same bridge. The relation also enables tagging a reference number for the bridge.
- Proposed_features/aqueduct - a proposal for historic aqueducts
Short tutorial on bridge mapping
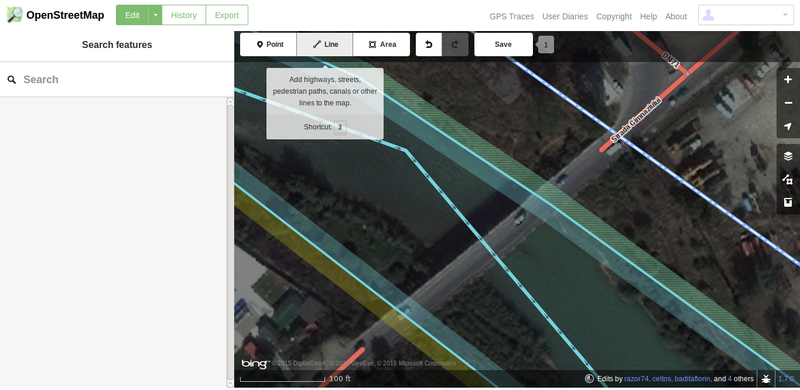
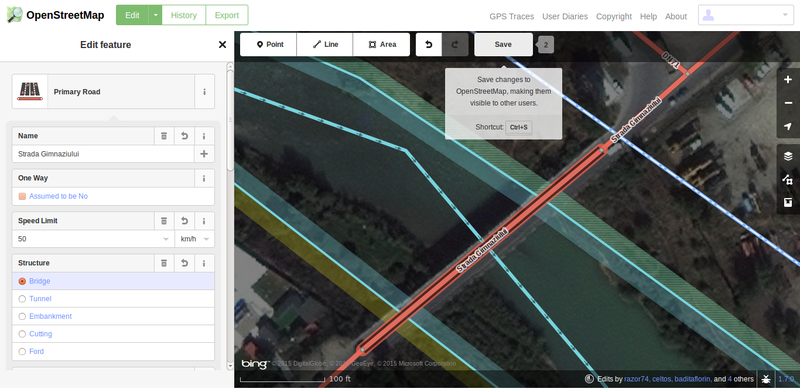
- As can be seen in the image below, the primary road stops when it meets the river. So we are going to map the existing bridge over the river on the map below. We are going to attach the bridge segment to the existing road.
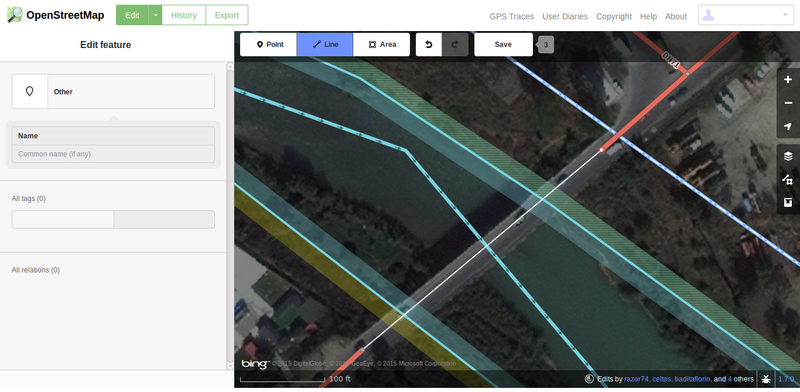
- Select the line tool from the top menu.
- Start mapping by using the line tool as follows:
- start on one shore, somewhere on the primary road, but don’t start the bridge mapping at the junction of the roads (the bridge should start/end before the junction)
- drag the line to the other shore, on the primary road, before the other junction of the road
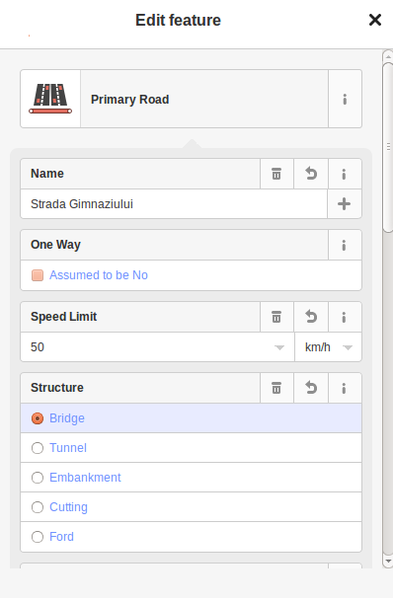
- The bridge in this case is situated on a primary road, so from the “Feature Editor” menu we are going to select “Road Features”, then look for primary road and select it.
- Next we are going to add more attributes to this segment of the road that we are mapping as a bridge:
- Name: is the name of the bridge, in this case the bridge gets the same name as the road that is upon; in other cases the bridge can be “between” the roads (one road at one end of the bridge, another road at the other end of it) - in that situation the bridge can get either of those names, or it can have a specific name
- One way: if the bridge is used just for going one way or the other (this bridge has both ways, so we don’t check this)
- Speed limit: is there any speed limit on the bridge (in this case the road speed limit is in effect on the bridge too, and it’s 50km/h)
- Structure: mapping the structure as a “Bridge”; the layer tag is automatically added with the default value of 1 (typical value for bridges).
- Access: type of access for this bridge (on this particular bridge all type of access is permitted so we leave everything on yes as default)
- Lanes: number of lanes. This bridge has 1 each way, so we set lanes=2
- Surface: choose what type of surfaces is the bridge made of (in this case is asphalt)
- Road Number: the reference number or code of the road; in this case since we are keeping the information for the bridge consistent with the one from the road, we are filling there the national name of the road (DN71).
- All tags: here are presented all the attributes of the newly mapped bridge
- to add a custom tag, click on the plus sign (at the end of the list), type the name of the tag and insert a value.
- Don’t forget to save your work!
See also
- approved and currently valid proposal - Proposed features/Bridge types
- previously approved version Approved features/bridge
- bridge:movable=* Type of movable bridge
- bridge:structure=* Load-bearing architecture of a bridge
- man_made=bridge Outline of a bridge
- building=bridge A building used as a bridge
- bridge=* Mark a way as leading over a bridge and type of bridge
- bridge:support=* Position of the structures which support a bridge from beneath
