JA:Openlayers Track example
Jump to navigation
Jump to search
はじめに
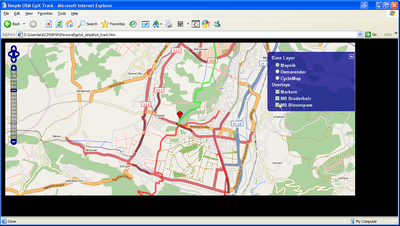
この例は、一つまたは複数の GPX トラックを OpenLayers 地図に表示する方法を示します。
この例は OpenLayers Simple Example を基にしています。
説明
必要なもの
- .gpx 形式 のトラック
- テキストエディタ (メモ帳など; その他何でも良い)
- ウェブブラウザ (Firefox, Internet Explorer, ..)
- あなたの時間を 3 分ほど :-)
手順
- gpx ファイルをウェブブラウザのあるフォルダに置きます
- 以下の HTML ファイルを作ります:
<html>
<head>
	<!-- Source: http://wiki.openstreetmap.org/wiki/Openlayers_Track_example -->
	<title>Simple OSM GPX Track</title>
	<!-- bring in the OpenLayers javascript library
		 (here we bring it from the remote site, but you could
		 easily serve up this javascript yourself) -->
	<script src="http://www.openlayers.org/api/OpenLayers.js"></script>
	<!-- bring in the OpenStreetMap OpenLayers layers.
		 Using this hosted file will make sure we are kept up
		 to date with any necessary changes -->
	<script src="http://www.openstreetmap.org/openlayers/OpenStreetMap.js"></script>

	<script type="text/javascript">
		// Start position for the map (hardcoded here for simplicity,
		// but maybe you want to get this from the URL params)
		var lat=47.496792
		var lon=7.571726
		var zoom=13

		var map; //complex object of type OpenLayers.Map

		function init() {
			map = new OpenLayers.Map ("map", {
				controls:[
					new OpenLayers.Control.Navigation(),
					new OpenLayers.Control.PanZoomBar(),
					new OpenLayers.Control.LayerSwitcher(),
					new OpenLayers.Control.Attribution()],
				maxExtent: new OpenLayers.Bounds(-20037508.34,-20037508.34,20037508.34,20037508.34),
				maxResolution: 156543.0399,
				numZoomLevels: 19,
				units: 'm',
				projection: new OpenLayers.Projection("EPSG:900913"),
				displayProjection: new OpenLayers.Projection("EPSG:4326")
			} );

			// Define the map layer
			// Here we use a predefined layer that will be kept up to date with URL changes
			layerMapnik = new OpenLayers.Layer.OSM.Mapnik("Mapnik");
			map.addLayer(layerMapnik);
// removed		layerTilesAtHome = new OpenLayers.Layer.OSM.Osmarender("Osmarender");
// removed		map.addLayer(layerTilesAtHome);
			layerCycleMap = new OpenLayers.Layer.OSM.CycleMap("CycleMap");
			map.addLayer(layerCycleMap);
			layerMarkers = new OpenLayers.Layer.Markers("Markers");
			map.addLayer(layerMarkers);

			// Add the Layer with the GPX Track
			var lgpx = new OpenLayers.Layer.Vector("Lakeside cycle ride", {
				strategies: [new OpenLayers.Strategy.Fixed()],
				protocol: new OpenLayers.Protocol.HTTP({
					url: "around_lake.gpx",
					format: new OpenLayers.Format.GPX()
				}),
				style: {strokeColor: "green", strokeWidth: 5, strokeOpacity: 0.5},
				projection: new OpenLayers.Projection("EPSG:4326")
			});
			map.addLayer(lgpx);

			var lonLat = new OpenLayers.LonLat(lon, lat).transform(new OpenLayers.Projection("EPSG:4326"), map.getProjectionObject());
			map.setCenter(lonLat, zoom);

			var size = new OpenLayers.Size(21, 25);
			var offset = new OpenLayers.Pixel(-(size.w/2), -size.h);
			var icon = new OpenLayers.Icon('http://www.openstreetmap.org/openlayers/img/marker.png',size,offset);
			layerMarkers.addMarker(new OpenLayers.Marker(lonLat,icon));
		}
	</script>

</head>
<!-- body.onload is called once the page is loaded (call the 'init' function) -->
<body onload="init();">
	<!-- define a DIV into which the map will appear. Make it take up the whole window -->
	<div style="width:90%; height:90%" id="map"></div>
</body>
</html>
- この HTML ファイルをブラウザで開きます
カスタマイズ
基本的な例がブラウザで動作したら、あなたのニーズに適応させるためにウェブページを変更します。
- 開始地点と地図のズームを変更します
- HTML ファイルをテキストエディタで開いて、以下の行を変更します:
// Start position for the map (hardcoded here for simplicity
// but maybe you want to get this from the URL params)
var lat=47.496792
var lon=7.571726
var zoom=13
- トラックを変更します
- HTML ファイルをテキストエディタで開いて、以下の行を変更します:
// Add the Layer with GPX Track
var lgpx = new OpenLayers.Layer.Vector("Lakeside cycle ride", {
	strategies: [new OpenLayers.Strategy.Fixed()],
	protocol: new OpenLayers.Protocol.HTTP({
		url: "around_lake.gpx",
		format: new OpenLayers.Format.GPX()
	}),
	style: {strokeColor: "green", strokeWidth: 5, strokeOpacity: 0.5},
	projection: new OpenLayers.Projection("EPSG:4326")
});
- Lakeside cycle ride はトラックの名前です。これはレイヤー切り替え部に表示されます。
- around_lake.gpx はサーバー上の GPX ファイルへのパスです。注意: 他のドメインからファイルを呼び出すことはできません。
- style: {strokeColor: "green", strokeWidth: 5, strokeOpacity: 0.5} ここでトラックが地図上でどう見えるかを制御しています。ここをどのように設定すればいいかに関する詳細については、 OpenLayers documentation を参照してください。
- 複数のトラックを表示したい場合は、単にこの 2 行をコピーして、再び値を変更してください。
